After you have created property groups, properties, departments, and roles, you can create the individual users and assign roles to them. A user can have a different role at each property; for example an individual may have full administration rights at one property, but only surveillance manager rights at another.
The User Accounts tab of the Administration module lists the users in the iTrak system.
A user does not have to be an employee; nor does an employee
necessarily have to be an iTrak user. If the user is an employee,
the employee's name appears in the Users grid.
You can provide temporary access with a defined start and end period. Temporary
users have the same access as other users, but their account will be disabled
outside of the defined activation period.
For information about manipulating the records in the grid, see Sorting and Grouping Records, Filtering Records, Searching for Records, or Using the Grid Functions as appropriate.
§ To clear a user's account settings, right-click on the user and choose Reset User Settings.
§ If the user has been locked out, right-click on their name and choose Unlock Account. To reset their password to be the same as their username, right-click on their name and choose Reset Password. The user will be prompted to change their password the next time they log on.
§ To make the User ID unavailable without deleting it, right-click on the user and choose Enable/Disable. You can set your General settings to hide disabled users from the Users grid.
1. Click ![]() Administration on the Shortcuts
bar to display the Administration form.
Administration on the Shortcuts
bar to display the Administration form.
2. On the User Accounts tab, click New to launch the User Configuration Wizard.
3. Enter the User Name (without spaces or special characters) that the person will use to log in.
4. Enter a Password for the user (they can change it later). The Never Expires check box only appears if the Security tab in the General settings is set to have passwords expire at a defined interval; select the check box to exempt this user from the password expiry policy.
5. Select the Department the user is associated with. This determines which roles are available to the user.
6. If this user will only have a defined access period, select the Temporary User check box, then enter the Activation Date and Expiration Date.
7. Click Next to continue.
8. Optionally, click Link Personnel to associate the user with an existing personnel profile.
A personnel profile is NOT required
for a user account to be active on the system.
If a linked personnel record has a value in the Date
Terminated field, the user account will be disabled.
9. Optionally, enter the user's full Name, Email Address, Gaming Card Number and/or Personnel ID, then click Next.
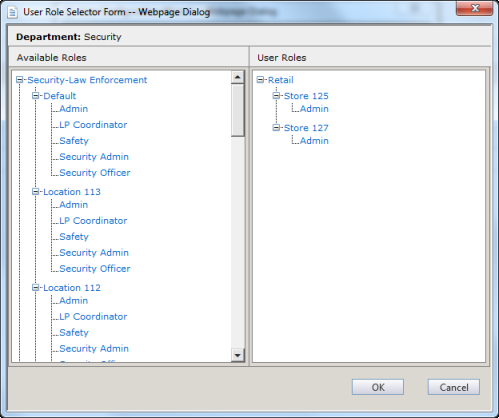
10. Click Edit to assign roles to the user. The User Role Selector form appears. Show example
o Select a role on the left and drag it to the right side. If applicable, assign other roles to the user as well (maximum one per property).
o To remove a role, select it in the list on the right and drag it to the left side.
o When you are finished, click OK.
11. Click Finish to exit the User Configuration Wizard.