
Profiles organise information on subjects, including banned/trespassed subjects or any other profiling information. To this large database, you can also add new profiles specific to your location.
Mandatory fields are shown in red text; most tabs are optional or display information related to the subject pulled from other areas of the system (a number beside the tab name indicates the number of entries on that tab).
To add a new profile:
1. Click New on the tool bar. The Profile form appears. Show example
2. Select the property associated with the subject, and assign a category to differentiate the profile. Categories are defined on the Dropdowns tab of the Administration form. Select the appropriate risk classification that you believe applies to this subject.
3. On the General tab, enter the First Name, Last Name, and Race, and any other additional identifying information about the subject. To add an alias, double-click below the last entry and type the new entry; to edit an alias, double-click on it.
If the first and last name match an existing subject, the
fields turn yellow and a warning icon appears.
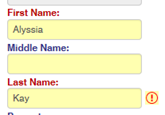
Click the icon to view the potential matches. You can choose to open or
delete the matched record, or right-click and choose Merge Duplicates (see Merging
Duplicate Records).
4. On the Details tab, enter contact and identification information for the subject. This tab is only visible if you have the appropriate permission.
You can enter as many IDs as available for the individual, such as a number or ID used from another system such as player tracking, driver's license, passport #, SSN/SIN, etc. Click Validate ID to update the date that an entry was last validated. For each ID entry, you can choose to suppress this information on reports.
5. On the Media tab, link any useful images and references to the record. For more information, see Attaching Media.
6. On the Secure Notes tab, enter any secure notes about this person. This tab is only visible if you have the appropriate permission; additional permissions allow you to view, add, or edit secure notes.
Click Add New and enter the note text. When you save the record, the entry is date- and time-stamped. If the entry is later edited, the Modified By information is recorded. Entries are cumulative. Multiple notes can be viewed with newest first or oldest first.
7. If necessary, attach any custom forms.
8. On the Associates tab, record other subjects that the subject associates with. This tab is only visible if you have the appropriate permission. If the associate is currently banned, the image appears with a red border.
9. On the Groups tab, record any groups the subject belongs to. All subjects currently linked to that group are shown. This tab is only visible if you have the appropriate permission. Groups are defined on the Dropdowns tab of the Administration form.
10. On the Activities & Specifics tab, record activities (e.g. games) in which the subject is known to participate, as well as any specific known behaviours. This tab is only visible if you have the appropriate permission.
11. If you want to control who can access this subject record, use the Document Control tab. See Controlling Access to a Record.
12. If circumstances warrant it, click Create Incident to create an incident record related to this subject. The Participant form appears where you can select the subject's role in the incident, followed by the Incident form to complete the rest of the information. See Creating an Incident for information about completing the incident record. The subject is added to the Participants tab. The incident number is shown on the Incidents tab of the subject record; double-click the incident number to open the incident.
13. Click Save and Close.
The remaining tabs will display information gathered from other areas:
Tab |
Description |
Incidents |
Shows a summary view of the incidents associated with the subject, including incident number, date, status and other details. |
Vehicles |
Lists any vehicles for which the subject is identified as owner (see Recording a Vehicle). |
Entries |
Shows all entries the individual made via the Patron Management module. Depending on your Patron Management settings, you may be able to limit the number of entries allowed in a period. |
Visits |
Provides summary information of visits involving this subject as captured in the optional Visitor Management module. There are two sub-tabs, which list occasions when the subject acted As Visitor and As Host. |
Gaming Disputes |
Provides summary information of gaming disputes involving this subject identified in the optional Audit module. |
Analysis |
Provides detailed information on the subject's gaming activities, as recorded in the optional Audit module. This tab is only visible if you have the Audit module installed and if you have the appropriate permission. |
Audit |
Lists all Audits in which the subject is listed as a participant. These audits may include gaming violations and performance of dealers and supervisors. |
Document Control |
Controls access to the records; see Controlling Access to a Record. |
Document Log |
Displays a history of actions taken on the incident record, as well as the sharing history. |